How To Integrate LeadPages With Drupal 7
LeadPages is a great lead generation tool that allows you to create custom landing pages (and other cool things) to place on your web site. Recently, we helped diaTribe increase their conversion rate by over 200% with a LeadPages integration in their Drupal 7 site. Here’s how we did it.
If you’re just looking for the files, you can access them below:
A Few Notes Before We Begin
The integration steps outlined below are intended for developers, but I have tried to make the solution as plug-and-play as possible. If you are familiar with Drupal, and have access to your server or can install new modules via the Update Manager, you should be able to follow along.
Also, it’s important to point out this solution uses Features to create and configure a few content types, so it may not not work on every single site (at least out of the box). It’s not designed to be a contributed module, just a quick starting point for setting up LeadPages on your own site.
Finally, I want to give a shout-out to S1L.org for their article that inspired this solution. I am using their general approach in this guide, only taking it a couple steps further by automating all the setup for you and streamlining a couple workflow steps.
Installation
If you are an experienced developer, the easiest way to get started is by using the command line and Drush to download and enable the relevant modules. Otherwise, you can use the Update Manager to manually upload and install all the goodies.
There are two custom modules provided in this guide:
- leadpages_feature: A feature that contains the base content types and configuration.
- leadpages_custom: Customizations to the content type forms and workflow.
OPTION 1: COMMAND LINE & DRUSH
Start by navigating to your modules folder and cloning our repository into it:
$ cd sites/all/modules
$ git clone https://github.com/spencerbrooks/leadpages-drupal7.git leadpages
Then use Drush to enable the leadpages_custom module. This will automatically download and enable all the needed dependencies for you:
$ drush en leadpages_custom -y
You may want to clear your cache and revert leadpages_feature to clear out any gremlins. If the feature appears overridden on your site, I find the Diff module extremely useful to review the exact differences between your code and database configuration so you don’t accidentally overwrite something import when you revert.
$ drush cc all
$ drush fr leadpages_feature
That’s it! You should have everything set up and ready to go.
OPTION 2: MANUAL UPLOAD
If you’re not comfortable with the command line or Drush, fear not! You can set everything up using the Drupal admin interface.
First things first, you’ll need to download all the necessary modules:
- Our LeadPages Drupal 7 integration (use Download Zip in the lower righthand menu)
- Features
- Entity API
- Strongarm
- CTools
- Static page
- Better Formats
If you have access to your Drupal codebase, you can unzip all the downloaded modules and upload them to /sites/all/modules. Alternatively, you can enable the Update Manager module and upload each zip file via the admin interface at /admin/modules/install.
Finally, enable the Leadpages Customizations module. Drupal will automatically enable all the other modules it depends on. That’s it!
Using The LeadPages Integration
CONTENT TYPES
There are two content types created after installation: Landing page and Thank you page. They represent the two types of pages involved when you work with LeadPages. The fields between them are identical. Why, you might ask?
When I originally created this solution for diaTribe, I only set up one content type. However, I quickly realized the thank you pages needed to be hidden from the site search as well as Google. Separating the two types of pages into different content types allowed me to set sensible defaults and configurations for each. I have a hunch you’ll find that flexibility useful as well.
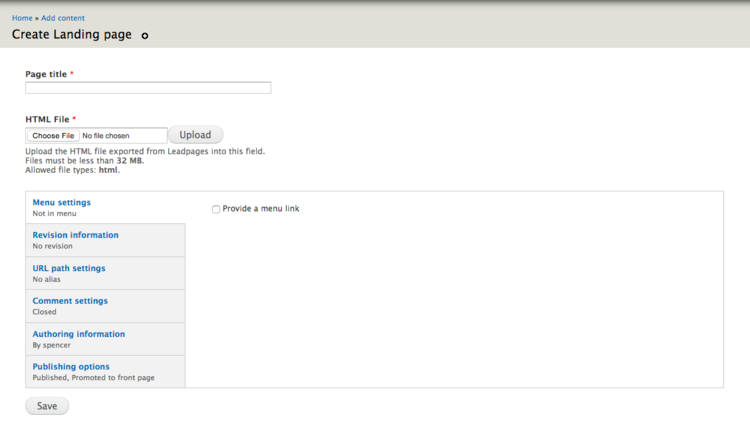
UPLOADING A LEADPAGE
To add a LeadPage to your Drupal 7 site, start by exporting your landing page and thank you page (if you’re not using the LeadPage default one) as an HTML file. Then, simply create a new Landing page or Thank you page and upload the file in the provided field. The Leadpages Customizations module will take care of inserting the source code into the Body field for you. No extra work required!
How It Works
CONTRIB MODULES & CONFIGURATION
The heavy lifting in this integration is done by the Static page module. It allows you to select specific content types which will bypass the Drupal theme layer. It’s what allows the LeadPages code to be displayed exactly as exported, without any Drupal markup being inserted.
It works in conjunction with a custom text format called No filter, which will let any markup into the database without touching it.
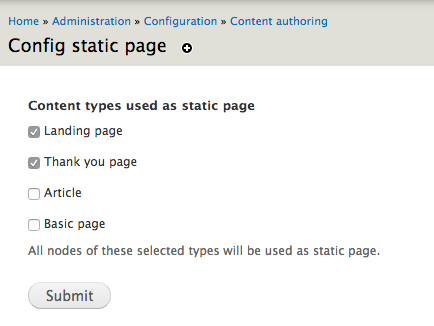
Static page configuration
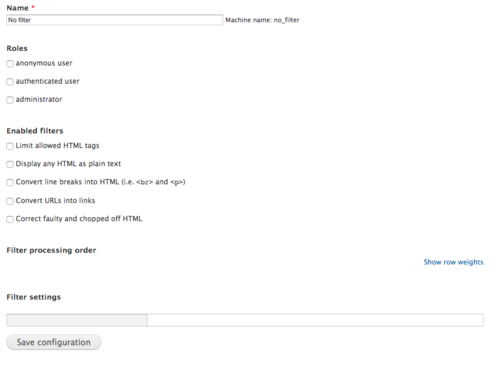
No filter text format configuration
The Better Formats module allows you to easily configure which text formats are available per content type, as well as set a default text format. This is not strictly necessary if you’re using our customizations module (which hides the body field and sets the text format programmatically), but it’s there if you need to tweak our module and show the Body field for any reason.
CUSTOM MODULE
Here’s where a lot of the fun stuff happens. We start our customizations by using hook_form_alter() to hide the body field on our content types:
/**
 * Implements hook_form_alter().
 *
 * Quick way to apply the same changes across multiple forms.
 */
function leadpages_custom_form_alter(&$form, &$form_state, $form_id) {
  // Set the content type forms which have the body field hidden.
  switch ($form_id) {
    case 'landing_page_node_form':
    case 'thank_you_page_node_form':
      // Hide the body field.
      $form['body']['#access'] = FALSE;
      break;
  }
}
Then, on node insert or update we insert the contents of the uploaded HTML file into the body:
// Load the contents of the file and pass it into our helper function, which
// will insert the node title as a <title> tag into the <head>.
$html = file_get_contents($file->uri);
$body = _leadpages_custom_insert_title($html, $node->title);

// Load the landing page node inside an entity metadata wrapper so we can
// set and save values easily.
$wrapper = entity_metadata_wrapper('node', $node);

// Put the HTML inside the node body and save it.
$wrapper->body->set(array(
  "value" => $body,
  "format" => "no_filter",
));
field_attach_update('node', $node);
If you examined the code closely, you might have noticed a call to _leadpages_custom_insert_title(). LeadPages does not include a <title> tag in their HTML export file, so this function takes the node title and inserts it into a <title> tag inside the uploaded code.
// Get the site name to insert at the end of the title.
$site_name = variable_get('site_name');

// Assemble the <title> tag we want to insert.
$title = "<title>$node_title | $site_name</title>";

// Check to see if the <head> tag exists, and insert the title accordingly.
// If there is no <head> tag, then we leave HTML unaltered. Leadpages exports
// have <html> + <head> tags by default, so it's unlikely that in the future
// they will remove them.
if (strpos($html, "<head>") !== FALSE) {
  // Get the HTML body up to and including the <head> tag, and separate it
  // from the HTML that appears after the <head> tag.
  $split_location = strpos($html, "<head>") + 6;

  $html_before = substr($html, 0, $split_location);
  $html_after = substr($html, $split_location);

  // Reassemble the HTML body with the <title> tag in the correct position.
  $html = $html_before . $title . $html_after;
}
Like I mentioned before, this happens when you create or save a node, so if you upload new HTML or change the page title it will automatically save your changes to the body field.
Conclusion
I hope this how-to guide on integrating LeadPages with Drupal 7 was helpful! If you have questions, comments, or thoughts on this guide, please don’t hesitate to leave a comment.
In case you want to save the code for later, here’s a link to the GitHub repository: